
Working with loops offers a whole host of creative possibilities and a near endless stream of inspiration. Once you’ve begun working on an idea, however, it can be difficult to know how to develop it. This is why it’s important to know how to get the most out of your loops, and in this Ableton tutorial I’ll be teaching you some sample chopping techniques that will allow you to achieve exactly that by turning pads, synths & keys into complex rhythmic sequences.
To start, I’ve loaded two loops into arrangement view in Ableton Live – 100_C#_pads_01_SP from our Future Electronica pack (a lush synth pad) and 142_Perc_SP_12 Complex Percussion & Textures (a groovy, dynamic percussion loop).

Our loops, ready to go!
We’re going to use stock Ableton tools to create a composite sound which combines the harmony and timbre of the pad with the rhythm and dynamics of the percussion loop. You’ll notice that the pad and percussion are at different tempi – we’re going to set the project tempo to 100 and use Ableton’s Beats warp mode to extend the percussion loop.
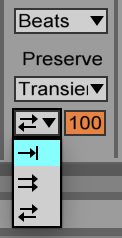
Double click on the percussion loop and ensure Beats is selected in the warp dropdown box. Then turn off transient looping, and set the transient envelope to a low value, between 30-40. Soloing the percussion track and pressing play, you’ll hear that the loop is now slower and the hits are all cut short – this is what we’re looking for.

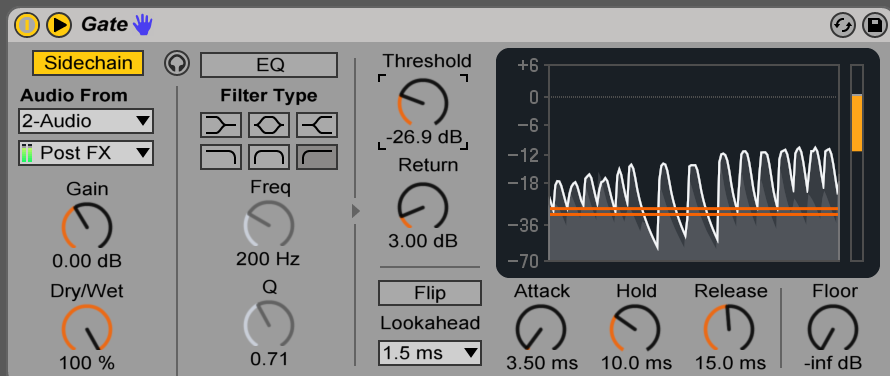
Now we’re going to impose the rhythm of the percussion loop onto the pad. To do this we’ll use the sidechain function in Ableton’s built in Gate. Drop a Gate on the pad track, click the arrow in the top left to open the sidechain panel, turn on the sidechain function and set the Audio From dropdown box to the percussion track.

Pressing play, you’ll probably hear a much quieter pad with an occasional spike in volume. Turn the Floor dial all the way down to -inf dB, and with the loops still playing, gradually turn down the Threshold control until you hear a rhythmic version of the pad poke through and you see white “spikes” in the display on the right.
“You’ll immediately hear how this technique could be helpful for creating everything from buildups to grooves.”
Now we’ve imposed a rhythm, try playing with the attack, hold and release controls. You’ll immediately hear how this technique could be helpful for creating everything from buildups to grooves.
For now, though, let’s settle on a simple stab with an attack of 3ms and a release of 35ms. Whilst we have successfully imposed the percussion rhythm onto the pad, the dynamics of the percussion loop were lost in the process and the sound is also a little unrefined. Let’s use Ableton’s Auto Filter and its endlessly useful sidechain envelope follower to deal with this. Place one after the Gate and set up the side chain panel in the same way.

Now let’s turn down the cutoff frequency and turn up the resonance a little.
If we turn up the Envelope control, we’ll hear the filter begin to open and close with the rhythm of the percussion loop. The effect is a little too subtle, though, so we need to turn up the gain on the sidechain input in order to get the results we’re looking for.

Again, we can tweak the attack and release controls to shape our sound. Here I’ve gone for a short attack and medium release to create a soft stab sound.
And it’s as simple as that! By trying different combinations of loops, and varying attack and release settings, you can combine rhythms and timbres to create a variety of musical effects.