
Introducing the go to audio effect and a personal favourite of team Samplephonics, the humble delay-ay-ay-a-y-y-y. An often-overlooked creative tool, this studio mainstay offers a wealth of sonic variation in both the spatial and creative contexts. In this music production tutorial, Rich from the team explores a few of his favourite techniques and shows just how effective this little effect can be.
Replace your reverbs – Space
A common issue in many mixes, whether that be of pro-standard or home studio quality is the over use of reverb. A poor reverb selection can leave a mix feeling lost and muddy with no clear focus, especially on vocals. A clever work around for this is to use a delay to create a sense of space and 3-D depth.
As you may know, any reflection or echo which has a super low delay time is perceived as not being a delay at all; hence the brain thinks this is a short reverb time i.e room verb.
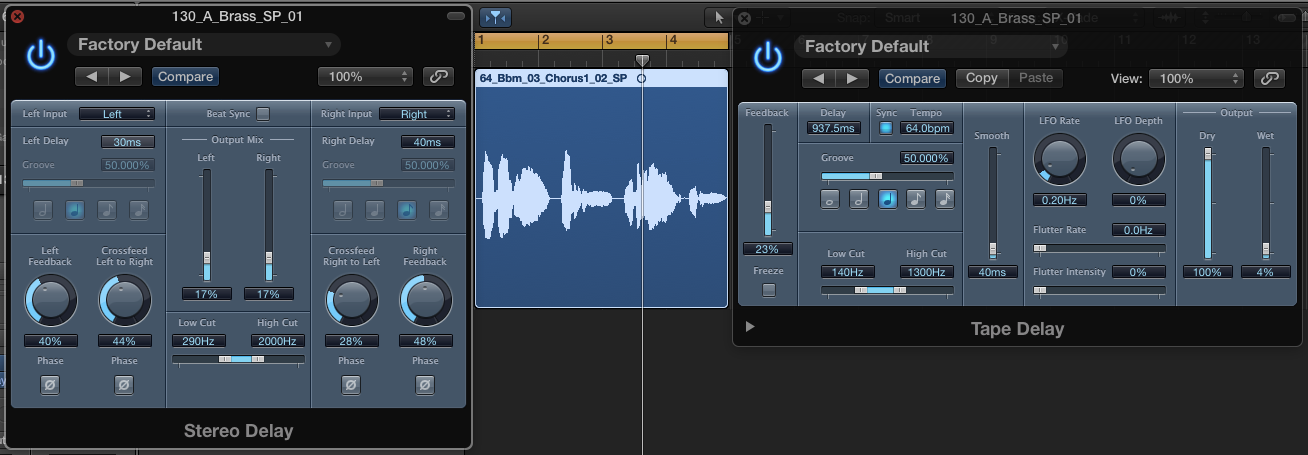
Using a snippet from our Natalie Major Vocals pack, in the audio example below, we explore the use of a short 30-40ms stereo delay in conjunction with a longer 900ms tape delay for added depth and space.
We can utilise this by placing super short stereo delays around a vocal or using the often forgotten ping-pong effect. This was especially well used in the 70’s but is a neglected method to create that added sense of space. When using short delays it’s worth experimenting with the filters as this can often soften the returns thus sitting them a little more comfortably in the mix.
Quick tip: Always explore different delay times. Sometimes longer times feel more natural!
“Placing your delays on sends allows you to develop a sense of continuity between the elements in your mix”
Sound unity – Sends not inserts
Back in the day, using delays on sends was often seen as a sweet way to save on CPU but with the development of more powerful computers and external DSP processing this isn’t as crucial. Interestingly though, those early pioneers were actually on to something and it’s not just computer power-related.
Placing your delays on sends allows you to develop a sense of continuity between the elements in your mix.
By choosing a few different delays with different tempo synced delay times and varying filters it offers you a huge variety of sonic possibilities but with the smug knowledge of knowing the mix will finish feeling unified and together. Various elements can move in harmony with each other creating a solid rhythmic backbone.
Dub FX – Using filters & feedback
A true Samplephonics favourite and a crucial element in the development of ‘that dub-sound’. Inspired by the works of King Tubby, Scientist and beyond let’s explore this a little further. A great feature within many delays is having the ability to automate feedback and filters at the same time (ooosh).
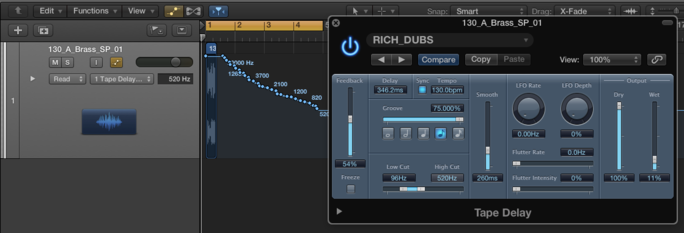
Let’s run through it, using a tasty little brass stab from the Roots Revival reggae sample pack. As the sound hits you’re going to want to have your delays feedback set pretty high. As the delays continue you’ll notice the delay starts to feedback on itself. Now for that dub sound, we can control this in a few ways:
• Work those filters – here we can bring down the low pass filter to remove the harsh tops. Same goes for the high pass, let’s clean up that bottom end
• Slowly lower the feedback – the delay starts to relax and the delays gradually begin to fade out.
• Automate the channel volume – keeps the noise of the delay feeding back on itself but clears some room and space.
• Try using dotted and Triplet patterns for extra swing.
Chain your FX – Duck those delays
Here’s a sneaky little tip I picked up a few years ago but is one that is rarely seen. When using delays on vocals the delay tail can often get caught up in the main vocal line and makes the lyrics less audible. Why not try placing a compressor on the delay return and side-chain that to the lead vocal. With a slow release time this can duck the delay when the vocal plays but gently bring in the sound of the delay when the vocal stops, creating a cool effect.
Sample delays for width
So here’s the geeky bit. The ‘Haas’ effect has taught us that this psychoacoustic effect allows the brain to localise sound depending on when it arrived at the ear. Now we can play on this and move sounds within the stereo field thus creating some mad stereo width to previously boring sound sources.
Which DAW you use will effect how this is done but the same principle can be applied to almost any piece of software:
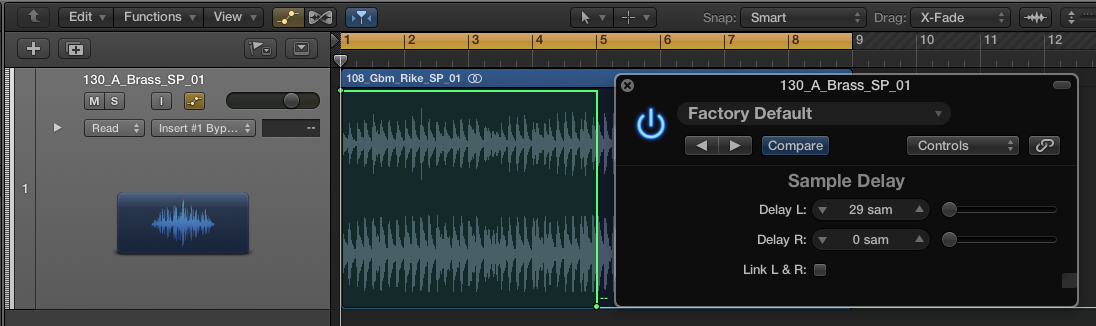
Logic – awesome tool called the ‘Stereo sample delay’. Chuck this on your channel and mess around with delaying one side. The more you increase the delay time the wider things will get. Beware of going too far though as you could push things out of time.
Ableton – Un-sync the *simple delay. Turn the ‘wet / dry’ mix to 100% then adjust one side to taste.
* Note – This can work with any stereo delay irrelevant of your DAW. Try it!
Calculating delay times
Crucial little bit of info here for anyone rocking hardware delays or reverbs. Getting things in time can make the world of difference to getting a solid, musical mix.
60,000 divided by BPM (Beats Per Minute) = delay or reverb time (quarter notes).
For example: 60,000 divided by 120BPM = 500 milliseconds (.5 seconds)
You can then use this result; it’s fractions, and/or multiples in your reverb and delay times.
*Note – Multiply by 1.5 for dotted values and .667 for triplets.
So there we have it, a wealth of options and varieties to fit any piece of music or production style. The delay really is an incredibly versatile and powerful tool so go home, get stuck in and add some awesome new dimension to your mixes.